Z390 is Intel’s leading and latest consumer side chipset. The motherboards with Z390 were released for the 9th generation of Core i series from Intel. These include Core i3, Core i5, Core i7, and for the first time, Core i9 nomenclature. The 9th generation of Core i series CPUs are still using the LGA-1151 socket with different pin layout than the previous versions though the 9th and 8th generation of the CPUs can be used on Z370 and Z390 chipsets.
Today, I will be taking a look at GIGABYTE Z390 AORUS PRO WIFI Gaming. This motherboard is sitting below the Ultra motherboard in the AORUS family and given its price and plethora of functions, it is almost a perfect candidate for your bucks without breaking wallet yet offering a lot more. It packs powerful 12+1 power phases using doublers with adequate VRM cooling to relieve the users from the VRM cooling consideration. It has 2×2 Wave 2 WiFi solution with Intel Gigabit NIC. The board has two digital lighting headers as well as two 12V lighting headers. Seldom, I have seen a company going all out giving two each of such headers in this price range. The motherboard has two M.2 ports with thermal guards. It has a plethora of hybrid fan/pump headers, two external thermal sensors and plentiful of thermal sensors on the board including the VRM. It has reinforced DIMM slots in dual-channel configuration with LEDs on the edges. The PCIe x16/x8 slots are also reinforced and it supports two-way NVIDIA SLI as well as AMD CrossFire. The on-board audio solution is driven by ALC1220-VB using WIMA capacitors. Well, the list is lengthy; here are some of the features of GIGABYTE Z390 AORUS PRO WIFI:
Supports 9th and 8th Gen Intel® Core™ ProcessorsDual Channel Non-ECC Unbuffered DDR4, 4 DIMMsIntel® Optane™ Memory Ready12+1 Phases Digital VRM Solution with DrMOSAdvanced Thermal Design with Multi-cuts Heatsinks and HeatpipeOnboard Intel® CNVi 802.11ac 2×2 Wave 2 Wi-FiALC1220-VB Enhance 114dB(Rear) / 110dB(Front) SNR in Microphone with WIMA Audio CapacitorsIntel® Gigabit LAN with cFosSpeedRGB FUSION 2.0 with Multi-Zone LED Light Show Design, Supports Addressable LED & RGB LED StripsSmart Fan 5 features Multiple Temperature Sensors and Hybrid Fan Headers with FAN STOPFront USB 3.1 Gen 1 Type-C™ HeaderDual Ultra-Fast NVMe PCIe Gen3 x4 M.2 with Thermal GuardsMulti-Way Graphics Support with Dual Armor and Ultra Durable™ DesignCEC 2019 Ready, Save Power With a Simple Click
For detailed specifications please follow the manufacturer’s link here.
Packaging and Unboxing
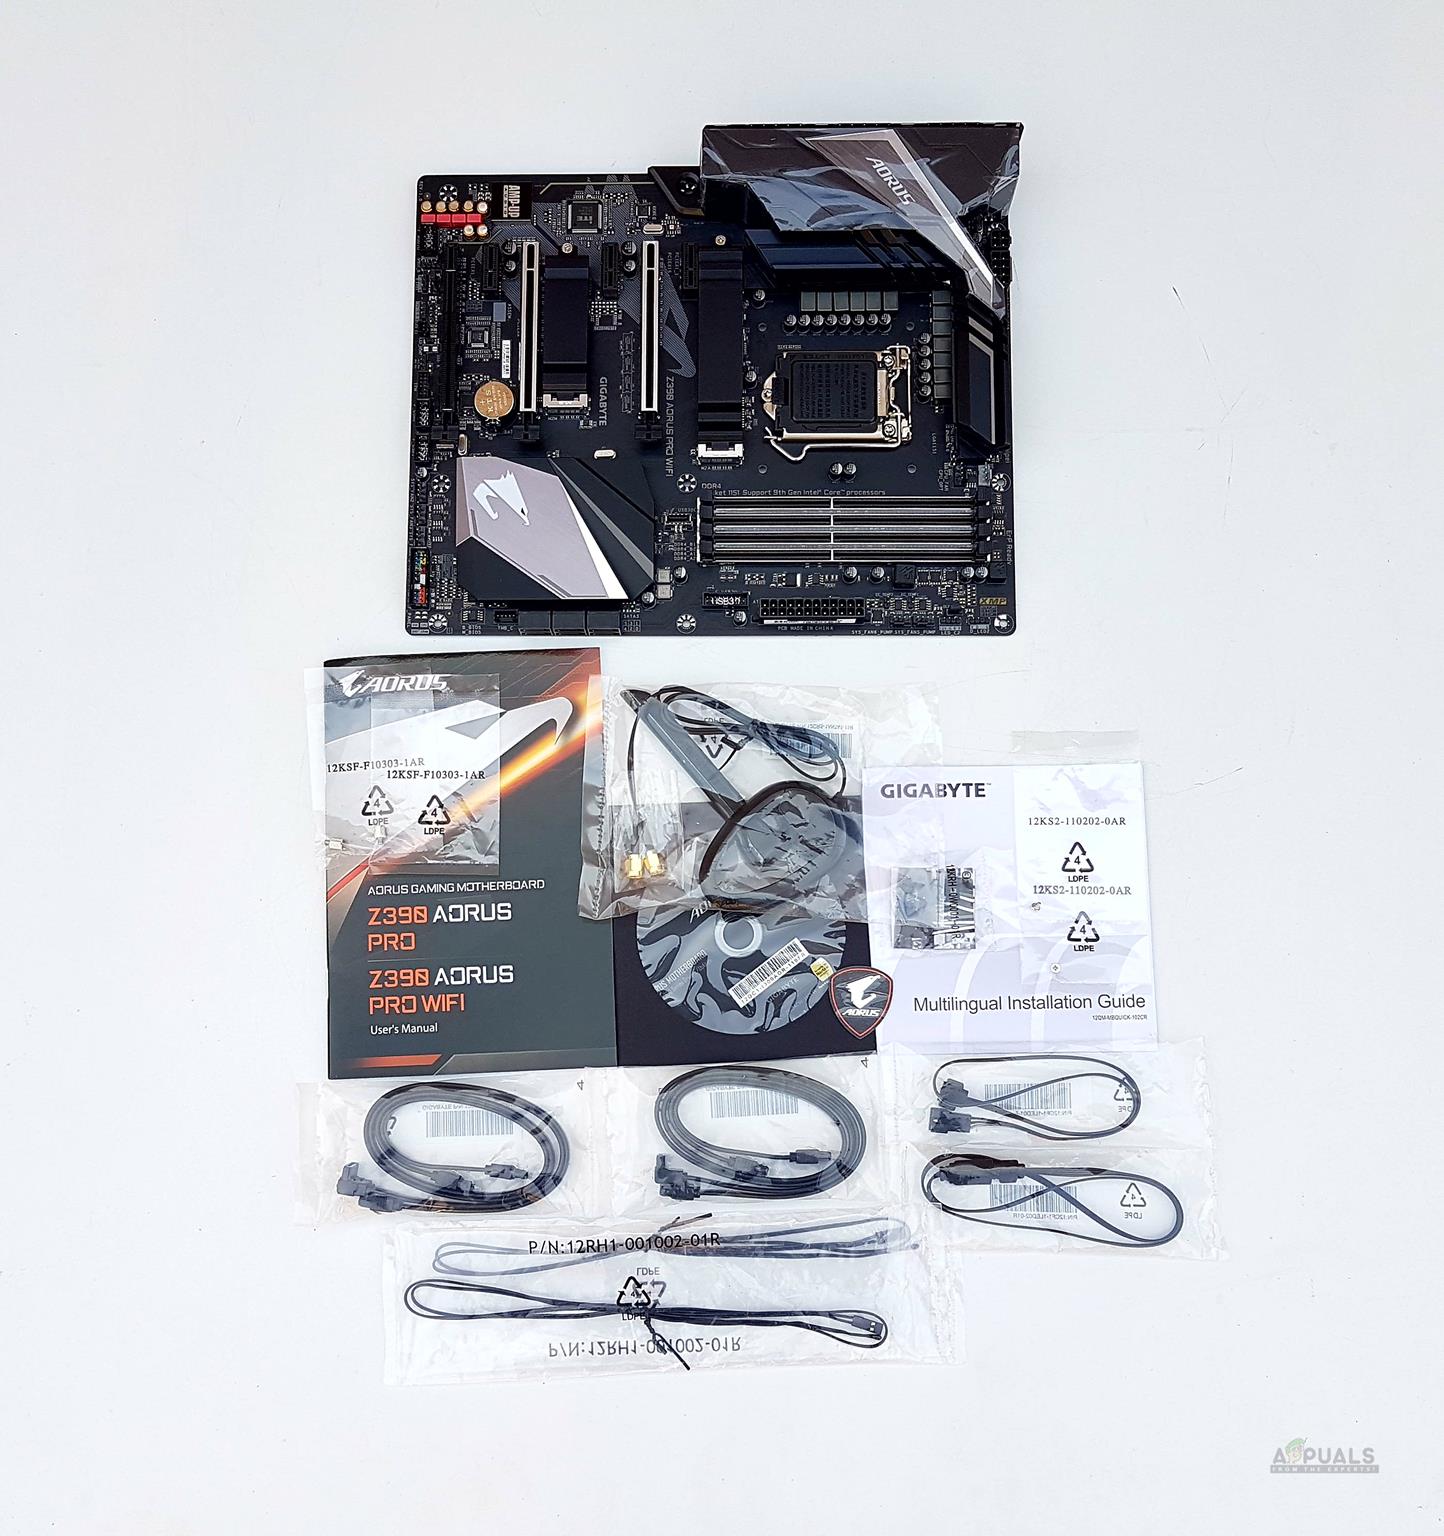
The motherboard is shipped inside a cardboard-based packing box. The opening side of the box has an AORUS brand name and logo printed on the top left. The Falcon logo is printed up top. Z390 AORUS Pro WiFi Gaming Motherboard text is printed at the bottom left side. Salient features are highlighted on the bottom right side along with with Intel Optane ready, Core 9th gen, and Z390 chipset badges. The backside of the packing box has a picture of the motherboard printed on the top left. The model of the motherboard is printed up top. The specifications are printed in the tabular format. There are pictures on the main section showcasing the salient features. Lastly, the motherboard is enclosed in an anti-static transparent container and is placed above the accessories.
Accessories and Contents
1x Motherboard1x WiFi Antenna1x G Connector1x Installation Disk1x User Manual1x Installation Guide2x SATA Cables2x RGB Extension Cable2x M.2 Standoffs and Screws2x Thermal Probe cables
Closer Look
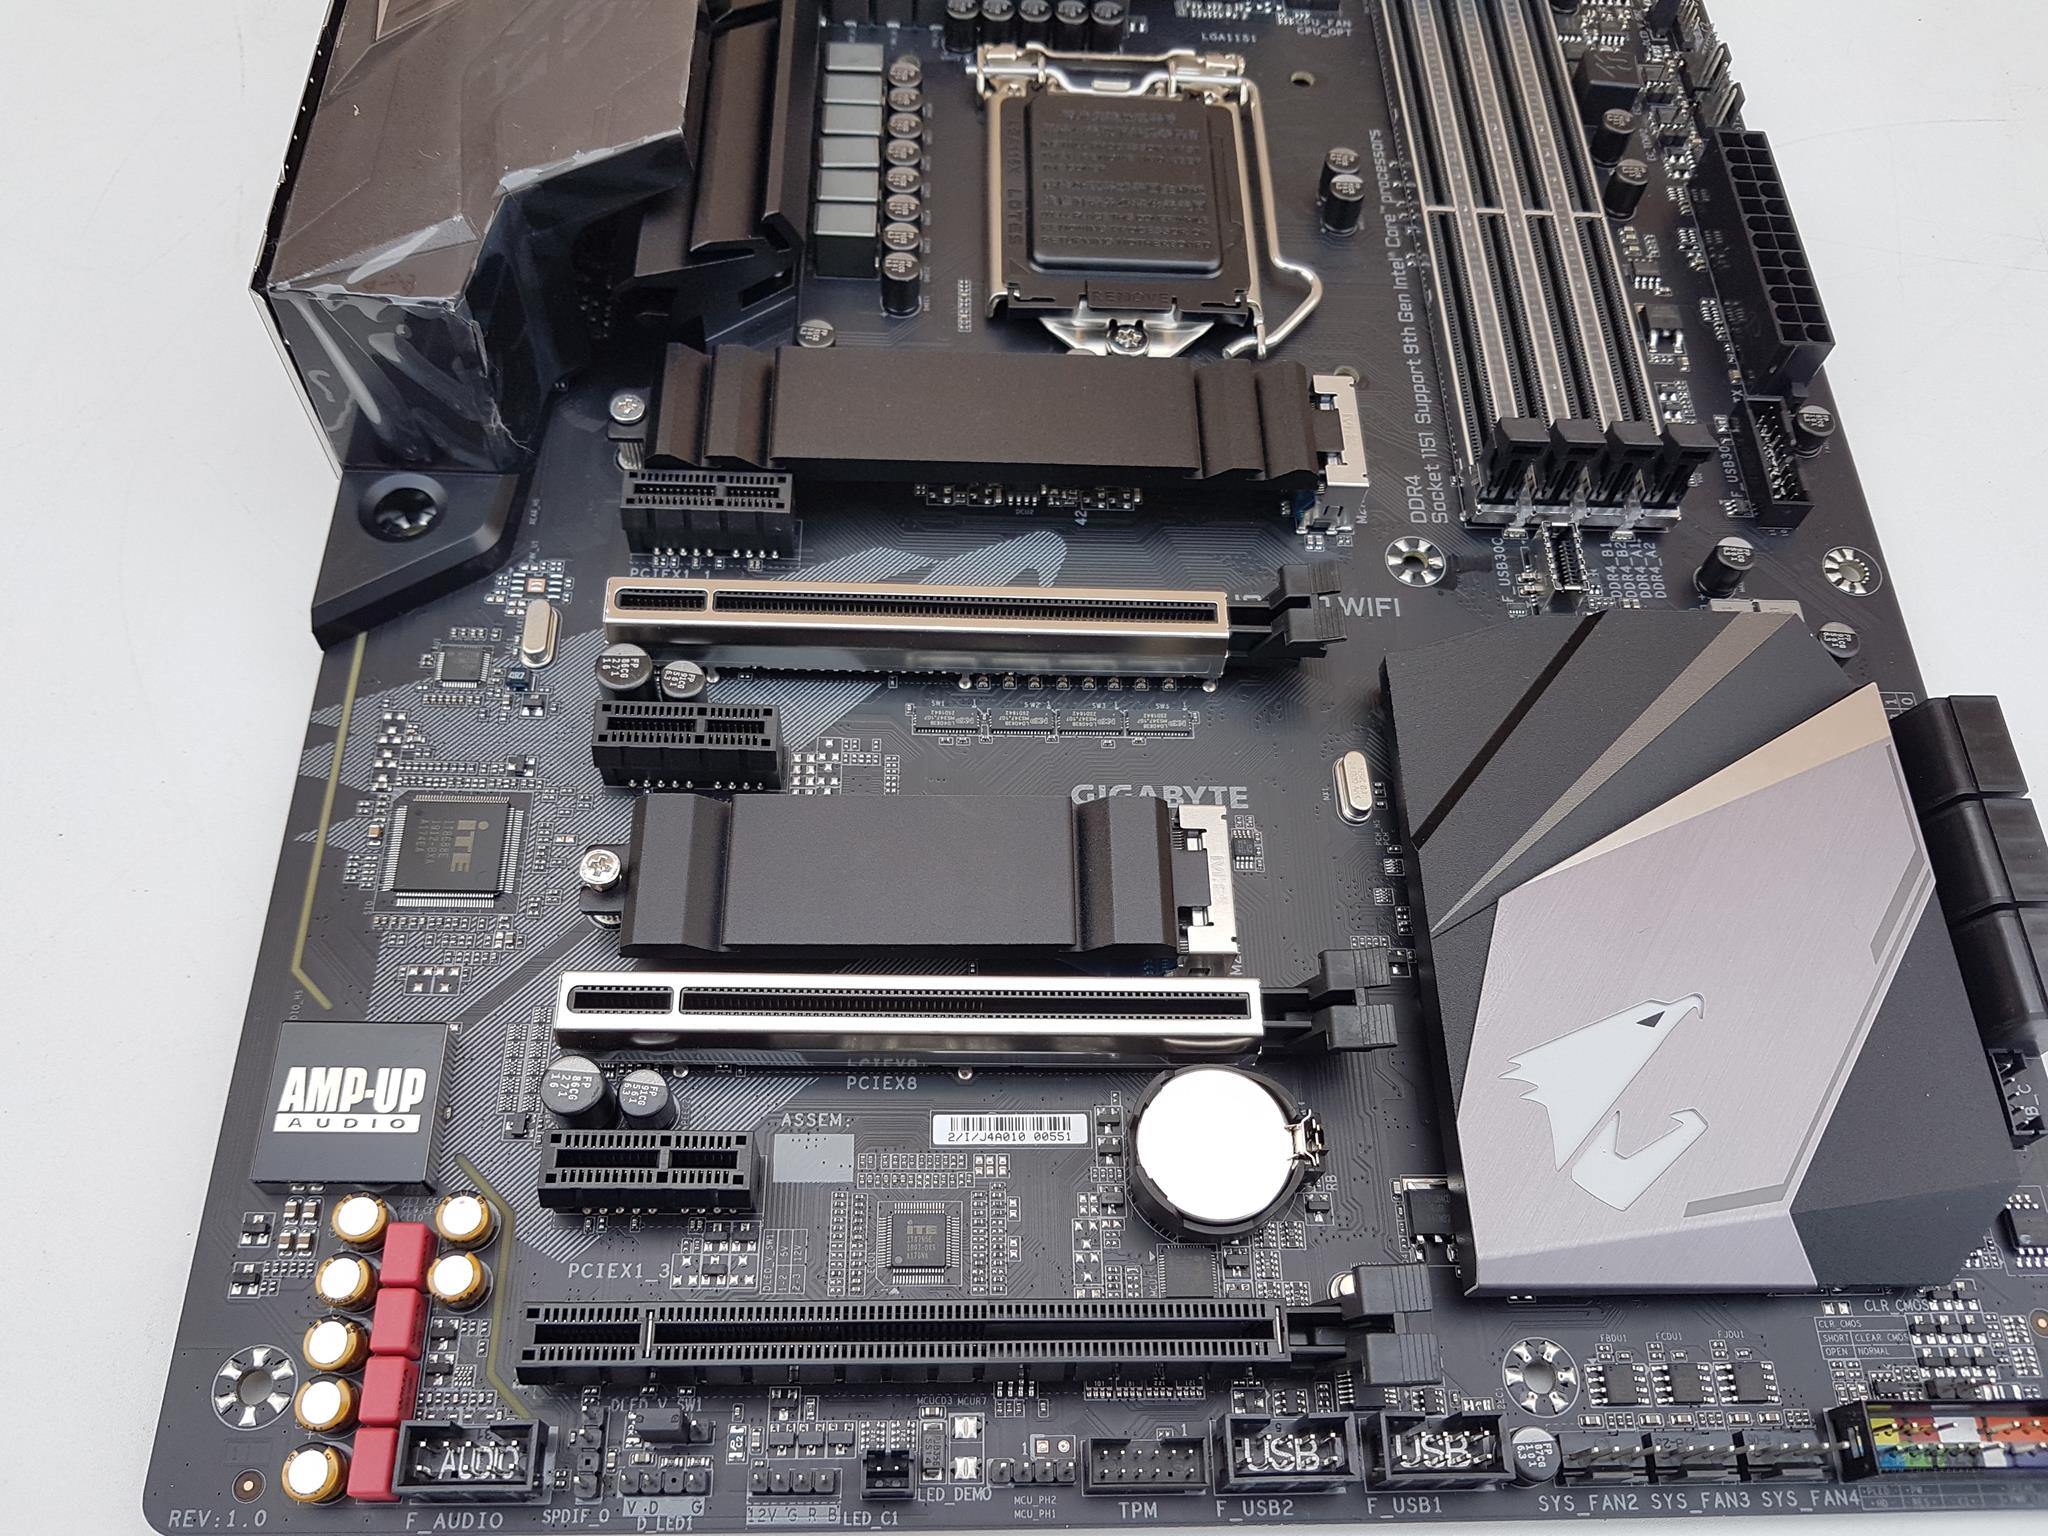
The GIGABYTE Z390 AORUS Pro WiFi motherboard packs powerful 12+1 Phases IR Digital VRM, screws mounted Heatsink & Direct Touch Heatpipe, Dual PCIe M.2 with Thermal Guards, Intel® WiFi 802.11ax, Intel® GbE LAN with cFosSpeed, USB Type-C, RGB Fusion 2.0 and plethora of utilities and applications. This motherboard has an integrated I/O shield which is another common becoming trend from the various manufacturers and to please the user, it has an RGB LED underneath as well. It is time to take a closer look at the PCB of the motherboard and its layout. Let’s take a look at the overview of the motherboard in pictorial view and kick start the closer look section. The motherboard has mostly blackish colour accents making it a perfect candidate for any colour build. The stencilling is mostly in black colour as well. There is a grey-coloured Falcon stencilling on the lower left part of the motherboard which looks good in the overall symphony of the design. We have 4x DIMM slots for DDR4 RAM, 6x PCIe 3.0 slots at X16/X8/X4/X1, 6x SATA ports, Thunderbolt port, USB 2.0 ports, USB 3.1 Gen 1 ports, onboard audio solution, Intel GbE NIC, onboard WiFi solution and nice handy I/O connectivity options. We will be taking a closer look at each down the road. The PCB has ATX form factor measuring 30.5cmX24.4cm and has support for Microsoft Windows 10 x64. Let’s start with taking a look at the board from the top side. The GIGABYTE Z390 AORUS Pro WiFi Gaming motherboard has Intel LGA-1151 socket; the same socket which we have been seeing ever since the Skylake times with some variations for each generation or iteration. There is a small arrow indicator on the socket’s cover indicating the corner to which the arrow marked side of the CPU has to be aligned. The Intel LGA-1151 on The GIGABYTE Z390 AORUS Pro WiFi Gaming motherboard supports Intel 8th and 9th generation of Core i series CPUs. The shroud on the VRM heatsink and rear I/O is stylish, bold, aggressive and bodes well with the overall design on this section. The shroud itself is made of the plastic and it has an RGB LED underneath. The shroud is secured to the PCB using three screws from the backside. GIGABYTE has gone all out on the VRM design and its cooling in the AORUS family in the Z390 series. All of their motherboards in this line packs almost similar VRM design and cooling and Z390 AORUS PRO WIFI Gaming Motherboard is no exception to that and I am glad for it. There are two black colour coated aluminium heatsinks with multiple cut-outs to increase the surface area for effective heat dissipation. This is not only an effective cooling solution but looks that damn good and stylish as well. Both heatsinks are connected using a heat pipe. GIGABYTE has used 1.5mm thick thermal pads between the important contact points on the PCB and the heatsinks thus ensuring there is no corner left unchecked when it comes to providing a powerful cooling solution for the MOSFETs. The GIGABYTE Z390 AORUS Pro WiFi Gaming motherboard uses an all IR digital CPU power design which includes both digital PWM Controller and PowlRstage MOSFET and is capable of providing at least 50A of power from each phase. The 12+1 power design is actually using doubles to achieve the power delivery target. It has 6 IR Phase doublers with 12 IR PowlRstage MOSFETs. And on top of all these, we have IR digital controller (PWM). If you are wondering why 1 instead of 12+2; in my opinion, it makes sense as the majority of the users won’t be buying these motherboards only to use the iGPU and not the dedicated one hence dedicating a single power phase to the iGPU would do the job. GIGABYTE’s exclusive 2X Copper PCB design provides sufficient power trace paths between components to handle greater than normal power loads and to remove heat from the critical CPU power delivery area. This is essential to ensure that the motherboard is able to handle the increased power loading that is necessary when overclocking. The 8+4 power connectors to power the CPU are located on the top left most side. The provision of extra 4-pins is for the Intel Core i9 990K and related variants of the same silicon. GIGABYTE has even provided this extra power on this priced motherboard. There is a 4-pin PWM hybrid Fan Header as well. The GIGABYTE Z390 AORUS Pro WiFi Gaming motherboard features solid plated ATX 24pin & ATX 12V 8pin + 4pin power connectors to offer a stable power supply. This is advantageous as there is a larger contact area for the electricity with more metal quantity to sustain the higher power and heat. There are 4 stainless steel reinforced DIMM slots on the GIGABYTE Z390 AORUS Pro WiFi Gaming motherboard. These are in the Dual Channel configuration. The maximum capacity is 128GB with 32GB per DIMM slot and the maximum supported frequency is 4266 MT/s (OC). This motherboard supports ECC Un-buffered DIMM 1Rx8/2Rx8 memory modules (operate in non-ECC mode) as well non-ECC Un-buffered DIMM 1Rx8/2Rx8/1Rx16 memory modules. Let’s take a look at the top right side’s connectivity provisions. Starting from the right side, there are two lighting headers. The rightmost one has 3-pins and is digital one whereas the one on its left side is +12V lighting header. Please, take a note on voltage readouts so as to ensure the correct connectivity to the supported RGB/ARGB LED devices. Connecting a 5V LED device on 12V connector will damage the LEDs. Coming along, we have two 4-pin pump headers. They are hybrid in nature are labelled as Sys_Fan_Pump 5 and Sys_Fan_Pump 6. You can connect 3pin and 4-pin fans to these headers as well and control their operation through the Smart Fan 5. Next, we have a 24 pin ATX connector. The motherboard is made in China. Going further down, there is a USB 3.0 front panel connector. There is a USB 3.1 Gen-1, Type-C connector located right in front of the DIMM slots. The location of this header is surprisingly making no sense here as it is obstructed by the latch of the slot. If the user has connected front panel’s USB 3.1 Type-C cable of the chassis to this connector and all 4 slots are populated, then the user will be forced to remove the Type-C cable first before removing the RAM from the slot no 2 as the connected cable will obstruct the unlocking of the latch. Since we are at it, there is a Realtek RT8120D for a single-phase PWM with the driver. For that, we have MOSFET configuration in the solution of 3 On Semiconductor 4C06N in a two-low one-high. There are 6x SATA ports rated at 6 Gbps located on the lower right side of the motherboard in front of the chipset cover. This motherboard supports RAID 0, RAID 1, RAID 5, and RAID 10. The lower right portion of the PCB has a thunderbolt header. I was surprised to see a thunderbolt header on this price motherboard. Kudos to AORUS design team! Going further down, there are 4 LEDs having VGA, CPU, BOOT, DRAM marking printed at the bottom. This is the troubleshooting mechanism provided on this motherboard. Each of these 4 LEDs is dedicated to the VGA, CPU, BOOT and DRAM. In case of any issue or error, the corresponding LED will lit up continuously until the problem is resolved. This is my complain area. There is a thunderbolt header yet no debug LED! The GIGABYTE Z390 AORUS PRO WIFI Gaming Motherboard features a full-length chipset cover finished in an elegant manner with colourful stencilling using black, grey and silver colours. There is a Falcon logo on the lower left side of the shroud. It has RGB LED underneath and lights up when powered on for some stunning and vivid looks. Let’s take a look at the connectivity options located on the bottom side of the PCB. Starting from the right side, we have a system panel connector. The base of the pins is colour coded for ease of identification and the corresponding configuration is labelled below the connector. Gigabyte has provided a G Connector which allows the user to easily connect the chassis front panel cables to this connector and then simply connect it to the front panel connector of the motherboard. There is a 2-pin header right on the top of the system panel connector which is called Clear CMOS jumper. The user can use this header to reset the CMOS. In order to do that, power off your PC and touch both pins at a time using the tip of a screwdriver which will short the circuit. On the next boot cycle, the BIOS would be reset to its default settings. On the left side of the front panel connector, there are 3x 4-pin hybrid fan headers. Each of all the fan headers is controlled by the nuvoTon 3927S controller. Next, we have two 9-pin USB 2.0 headers followed by a TPM header. There are two LEDs on the left side which are to demo the loaded RGB LED mode. Next, we have two lighting headers. The first one is +12V and the next one is +5V. Next is an SPDIF header and in the last, there is an HD Audio header to which the chassis’ front panel audio cable is connected which is optional though. There is a DLED_V_SW1/SW2 jumpers on this motherboard. The jumpers allow you to select the supply voltage of the D_LED1 and D_LED2 headers. Be sure to verify the voltage requirements of your digital LED strip and set the correct voltage with this jumper before connection. Incorrect connection may lead to the damage of the LED strip. The jumpers are set 5V on default using the pins 1 and 2. Setting the jumper to pins 2 and 3 will provide 12V to the digital lighting headers.
USB Ports
Following USB connectivity options are present on the GIGABYTE Z390 AORUS PRO WIFI Gaming Motherboard: Coming from the Chipset:
1 x USB Type-C™ port with USB 3.1 Gen 2 support on the back panel1 x USB Type-C™ port with USB 3.1 Gen 1 support, available through the internal USB header2 x USB 3.1 Gen 2 Type-A ports (red) on the back panel5 x USB 3.1 Gen 1 ports (3 ports on the back panel, 2 ports available through the internal USB header)
Chipset+2 USB 2.0 Hubs:
8 x USB 2.0/1.1 ports (4 ports on the back panel, 4 ports available through the internal USB headers)
PCIe Slots
Z390 AORUS Series Motherboards feature built-in PCIe 4.0 slots, delivering superior bandwidth compared to that from previous generation technology. Performance of Graphics cards and PCIe NVMe AIC SSDs will not be limited by insufficient bandwidth. This motherboard has a total of 5x PCIe 4.0/3.0 rated slots. Two slots are PCIe 4.0/3.0 X1 rated. There is only one dedicated PCIe 3.0 X16 slot which is electrically wired to the CPU socket. PCIe 4.0 slots have higher slot signal stability and lower impedance, maximizing PCIe bandwidth while also being backwards compatible with PCIe 3.0. Here is the configuration information of these slots:
1 x PCI Express x16 slot, running at x16 (PCIEX16)1 x PCI Express x16 slot, running at x8 (PCIEX8)The PCIEX8 slot shares bandwidth with the PCIEX16 slot. When the PCIEX8 slot is populated, the PCIEX16 slot operates at up to x8 mode.1 x PCI Express x16 slot, running at x4 (PCIEX4)3 x PCI Express x1 slots
The PCIEX8 slot shares bandwidth with the PCIEX16 slot. When using dual graphics cards, the PCIEX16 slot operates at up to x8 mode. The PCIe X16 and X8 slots are stainless steel armor reinforced on the outer shell. These brackets feature a double locking mechanism; first from the top and the second from the bottom for better retention.
M.2 Port
The GIGABYTE Z390 AORUS Pro WiFi Gaming motherboard has two M.2 ports using PCIe Gen 3 interface. Both M.2 ports have thermal shields with pre-applied thermal pads on them. Both these covers wobble unless populated.
1 x M.2 connector (Socket 3, M key, type 2242/2260/2280/22110 SATA and PCIe x4/x2 SSD support) (M2A)1 x M.2 connector (Socket 3, M key, type 2242/2260/2280 SATA and PCIe x4/x2 SSD support) (M2M)
The M2A port shared bandwidth with the SATA3 1 connector and M2M port shares bandwidth with the SATA3 4 and 5 connectors. Refer to the picture for the overall scenario of bandwidth sharing and resulting non-availability of SATA3 connectors.
Audio
The GIGABYTE Z390 AORUS Pro WiFi Gaming motherboard is using Realtek High-End HD Audio Codec ALC1220 120dB(A) SNR [110/114 dB(A)] HD Audio using VB Series audio controller. With Smart Headphone Amp it automatically detects the impedance of the head-worn audio device, preventing issues such as low volume and distortion. This motherboard is using a combination of Hi-Fi grade WIMA FKP2 capacitors and high-end Chemicon audio capacitors. While the high-end audio capacitors are suited for high-grade audio equipment, using state of the art technology to provide rich sound in the bass and clearer high frequencies, the WIMA FKP2 capacitors are being used widely in premium grade Hi-Fi systems. The addition of this to the exclusive AOURS AMP-UP Audio technology makes for the ideal onboard sound solution for the most demanding audiophiles. The audio section is implemented on a dedicated layered PCB. The audio solution is backed by 4 high-end Hi-Fi grade WIMA KFP2 Capacitors. These high-quality capacitors help deliver high resolution and high fidelity audio to provide the most realistic sound effects for gamers. LED trace path lighting Illuminates to show the separation of the PCB layers. Channel support is 2/4/5.1/7.1 and S/PDIF Out is supported as well.
LAN Connectivity
The GIGABYTE Z390 AORUS PRO WIFI Gaming Motherboard is using Intel 1 GbE NIC with a rated speed of up to 1000 Mbit. GIGABYTE has provided a cFosSpeed which is a network traffic management utility to improve the latency while maintaining the low ping rates for better responsiveness. In addition to the GbE NIC, this motherboard has a WiFi solution using Intel CNVi interface. Intel Next-Gen Wireless solution supports 802.11ac Wave 2 function, enables gigabit wireless performance, and supports 11ac 160 MHz wireless standard with speed up to 1.73Gbps. Moreover, Bluetooth 5 provides 4x range over BT4.2 and with faster transmission. GIGABYTE has provided an antenna in the accessories. All new antenna supported dual-band 802.11ax/ac 2.4GHz & 5GHz. It supports tilting and a magnetic base.
Dual BIOS
The GIGABYTE Z390 AORUS PRO WIFI comes with the Dual-BIOS feature. Though this board has dual BIOS, there is no provision for the user to control or switch between these BIOSes. There is Main BIOS and a Secondary BIOS which acts in a backup role. In case of any issue with the current settings for any reason, the motherboard on the next boot will automatically use the secondary BIOS and use it to give the user a chance to correct the settings from the UEFI. This board has a 2x 128 Mbit flash using licensed AMI UEFI BIOS. PnP 1.0a, DMI 2.7, WfM 2.0, SM BIOS 2.7, ACPI 5.0 are supported.
Thermal Monitoring and Cooling Solution
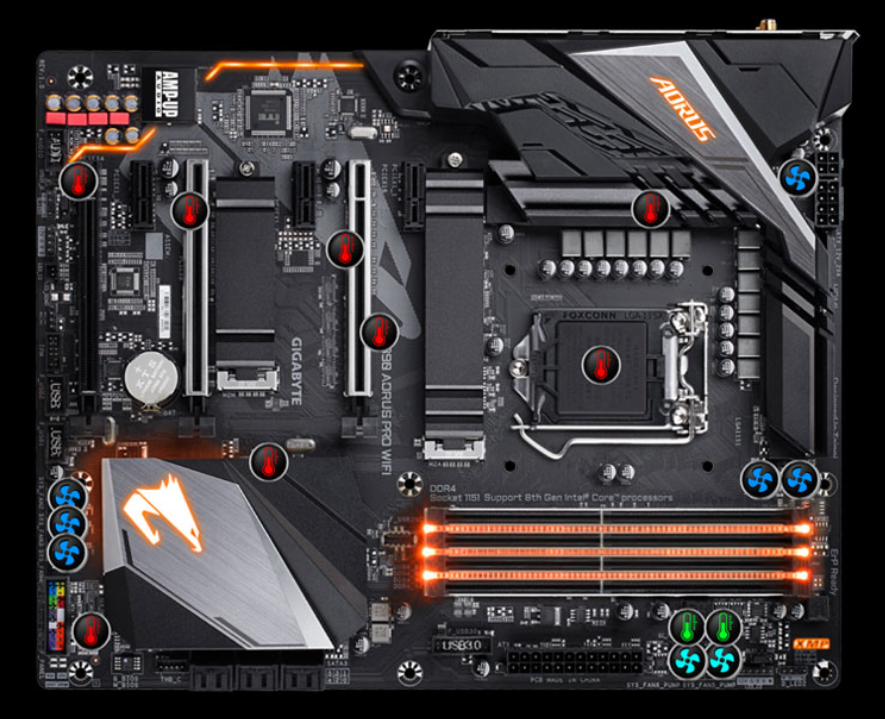
Now, it is time to take a look at the cooling provision on the GIGABYTE Z390 AORUS PRO WIFI Gaming Motherboard. The above picture shows the thermal sensors and fan headers provision on the GIGABYTE Z390 AORUS Pro WiFi Gaming motherboard. This motherboard comes with:
8 Fan / Water Pump Connectors8 Internal Temperature Sensors2 External Temperature Sensors
The GIGABYTE Z390 AORUS Pro WiFi Gaming motherboard comes with 8 sensors installed on the PCB. The GIGABYTE has provided two 2-pin sensor headers as shown in the green colour. There are two Pump/AIO headers which are 4-pin. All of these headers are hybrid in nature and each is rated at a maximum of 2A with over-current protection built-in through the nuvoTon 3947S controller. The user can control these headers either through the UEFI/BIOS using Smart Fan 5 utility or through the SIV utility from the Windows. Please, note that for SIV you will also need to have APP Center application installed first. Back I/O Panel
4x USB 2.0/1.1 ports2x SMA antenna connectors (2T2R)1x HDMI port1x USB Type-C™ port, with USB 3.1 Gen 2 support2x USB 3.1 Gen 2 Type-A ports (red)3x USB 3.1 Gen 1 ports1x RJ-45 port1x optical S/PDIF Out connector5x audio jacks
The HDMI port supports HDCP 2.2 and Dolby TrueHD and DTS HD Master Audio formats. It also supports up to 192KHz/16bit 8-channel LPCM audio output. The maximum supported resolution is 4096×2160@30 Hz, but the actual resolutions supported are dependent on the monitor being used. Here is the picture of the motherboard’s backside.
BIOS
Though GIGABYTE has been improving the user interface on their UEFI/BIOS, it is still not as good as the one provided by the ASUS or MSI but spending a bit of time will get you going. The BIOS interface is divided into 7 main menus. Starting with M.I.T, this section covers every aspect of the CPU and DRAM ranging from the frequency to core ratio to voltages and whatnot. It has been categorized in Frequency, Voltage and Memory Settings. CPU Core related advanced settings are located under Advanced CPU Core Settings. Memory settings are located under Advanced Memory Settings. DRAM timings are also located on this page. CPU Core voltage settings are located under Advanced Voltage Settings. This is where you will also find Advanced Power Settings. Load Line Calibration and Phase power settings are also located here. The favorite Menu keeps the user’s selected favourite settings for quick access. By default, it keeps the most visiting settings. The Smart Fan 5 utility can be accessed on the main menu of M.I.T. This utility gives total control of the connected fans/pumps to the user. The user can change the control type of the connected fan to PWM or Voltage. Voltage is for 3-pin fans. The Auto will work just fine as well. The user can set the custom fan curve as well. The control source can be set to CPU, external sensors, PCIe, etc. The user can also select the predefined speed control modes Full speed, silent, Normal, and Manual. Selecting Manual will allow the user to plot the graph according to the required custom fan curve. Alarms can be created based on the given temperature threshold. The System menu shows the model of the motherboard and BIOS version. BIOS menu is actually the BOOT menu. The user can control the boot time behavior of the drives and the system. Fast Boot can be activated from here as well as the CSM support. Boot drive priorities can be set from here. USB, NVMe, Network etc related settings are located under the Peripheral Menu. Chipset related settings can be accessed from Chipset Menu. System Power related settings can be accessed from the Power Menu. The user can create profiles under this menu. Rest it does what the name indicates; save the settings and exit the UEFI. The BIOS is loaded in the default mode which is Easy Mode. It has a graphical presentation of the overall components and related variables values like voltages, frequencies etc. Pressing F2 will switch to the Advanced Mode. Pressing F12 will capture the current screen and dump it in BMP format on the FAT16/32 formatted USB drive.
Software
GIGABYTE has provided tons of applications which the user can download from their website to be used for this motherboard. Their App Center is the basic application that is a must installed in order for all other applications to work except for the RGB Fusion 2. Here is a list of some of the applications:
@BIOSEZRAIDcFosSpeedSystem Information Viewer (SIV)Easy TuneFast Boot
System Information Viewer is what will give you the control over your fans/pumps right from the Windows. RGB Fusion 2 application allows the user to control the RGB Lighting of the motherboard and the connected RGB LED devices. This software also picks the RGB RAM though I have tested it with CORSAIR Vengeance Pro RGB kit only. It has a simple and intuitive interface which is self-explanatory. One tip here is to click on the home button and control the lighting from there.
Test Setup
Following test bench setup is used to test the performance of the motherboard:
Intel i5 9600kBALLISTIX 16GB @ 3000 MT/sNvidia GeForce GTX 1080 Founder’s EditionOpen LoopCORSAIR AX1200iSamsung PM961 250GBSeagate 2TB Barracuda
A quick note on the other connected devices: A total of 10 fans have been used which are BeQuiet Pure Wings 12 PWM High-Speed variants. D5 Laing pump is also used. SilverStone LS03 ARGB LED strips (3x) have been used which are daisy-chained and connected to the ARGB header of the motherboard. Why I am mentioning this information? The power consumption of the system will be reported in the testing section and this information is useful in that context. Microsoft Windows 10 x64 Pro (1903 update) was used for all the testing. Nvidia 431.60 drivers were used for graphics card testing. Following software were used for performance evaluation: – Storage Drive Tests:
AS SSDATTOCrystal Disk Mark
CPU Tests:
Cinebench R15Cinebench R20GeekBench 57-ZipAIDA64 ExtremeSuper Pi
Memory Tests:
AIDA64 Extreme
Overall System Tests:
PCMark10Performance Test
For gaming and synthetic bench of the graphics card following software were used:-
3DMarkAssassin’s Creed OriginShadow of Tomb RaiderGrand theft Auto VFar Cry 5
Testing
This section will show the results of the various test suites and gaming benchmarks that we have run on this motherboard.
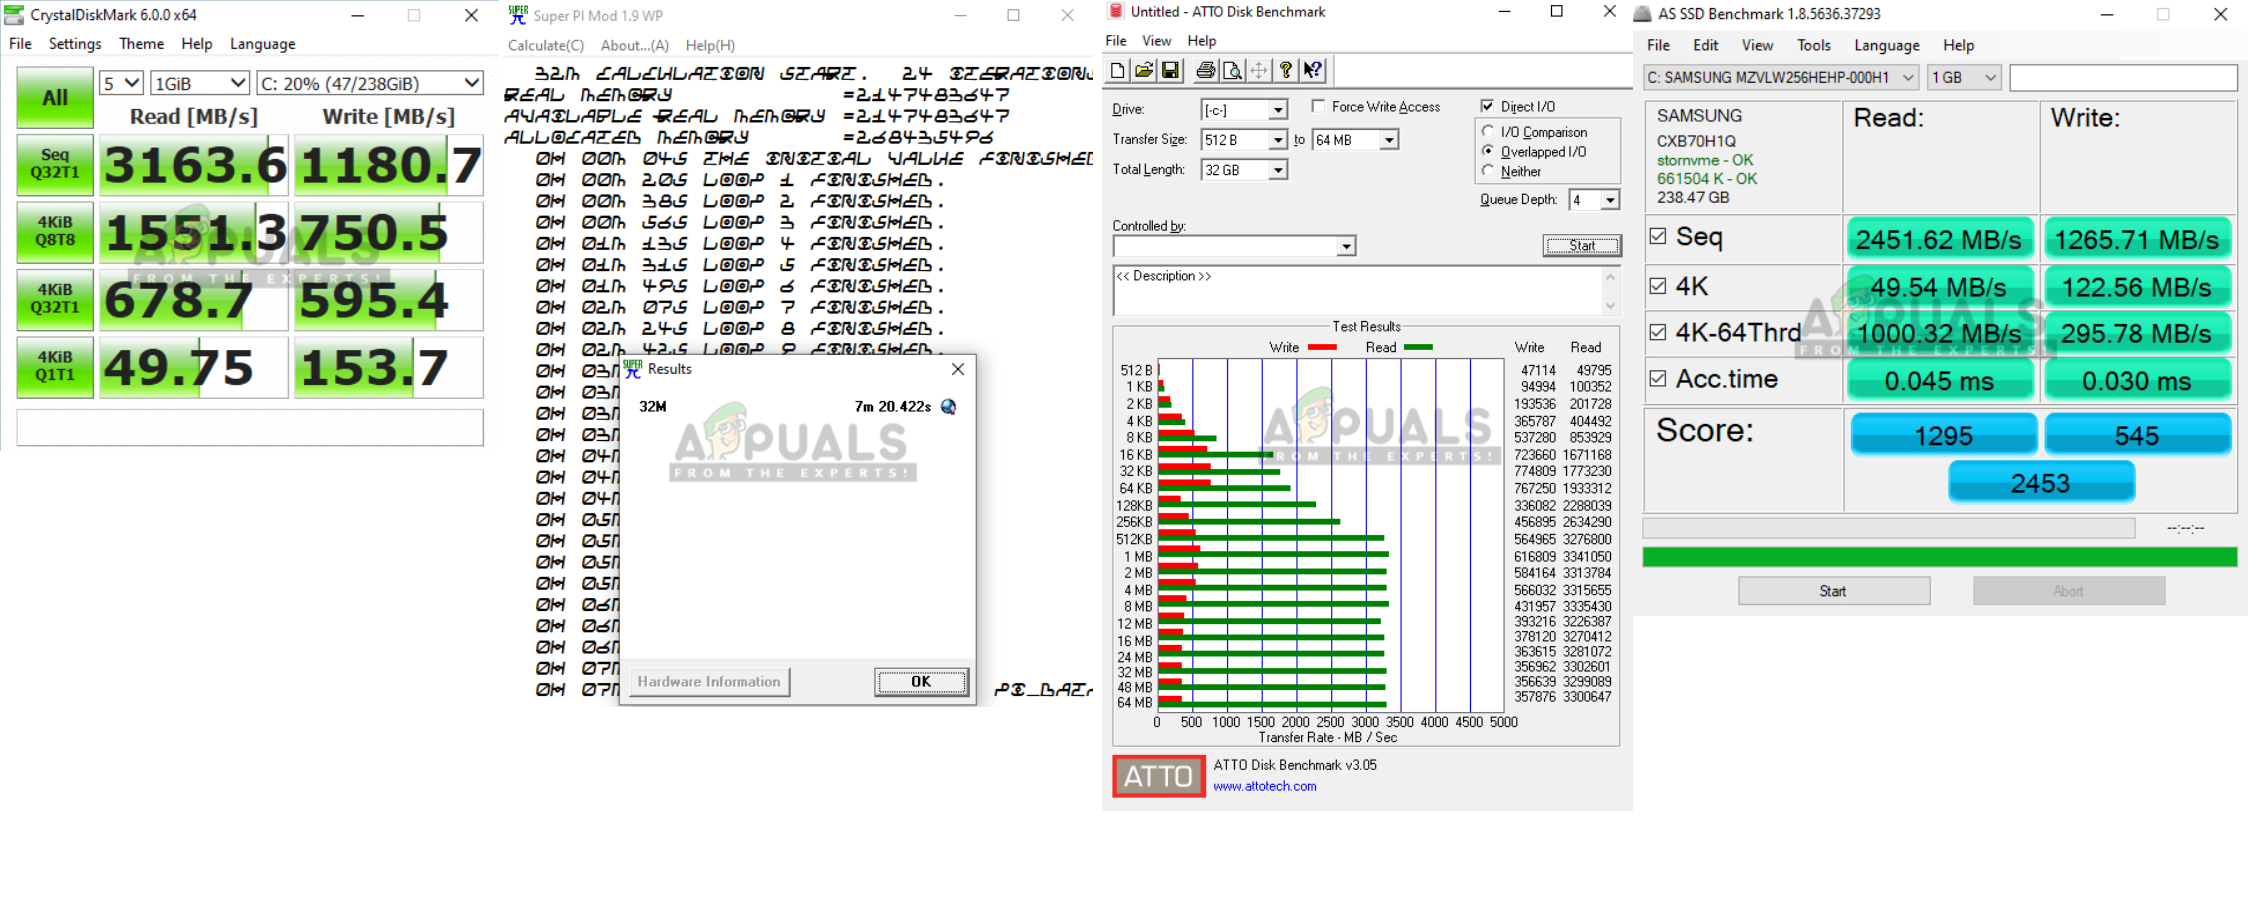
CrystalDiskMark, SuperPi, Atto, AS SSD
Gaming Benchmarks
Following games have been tested using their maximum graphics quality presets/settings.
Overclocking, Power Consumption, and Thermals
For the purpose of testing, we disabled the Gigabyte Core enhancement to stay with the Intel default’s. On stock, all the settings were left at Auto. AIDA64 Extreme 6.0 was used to stress the CPU (CPU, FPU, Cache, System Memory) to verify the overclocking. I am not reporting the stress test results here but the real-world data coming from the gaming and the rendering. I have used Witcher 3 on Ultra preset at 1080P and played around 1 hour before taking a reading. Similarly, the Blender benchmark was run on the CPU and reading was taken subsequently. CORSAIR Link software was used to take a reading of the power consumption. Here is the summary table: I was able to push the GeForce GTX 1080 FE to +205MHz on the Core Clock and +400MHz on the memory clock. Time Spy score is from combined overclocking of the CPU and the graphics card. This motherboard is taking more voltage to overclock the same chip to 5.0GHz than the Asus Strix Z390E motherboard which is what I don’t appreciate.
OC Results
VRM Thermal Test
The VRM temperature reported from the motherboard sensor was 51°C whereas it was 61.3°C as measured by Hti HT18 Thermal Camera. Here is the picture:
Conclusion
The GIGABYTE Z390 AORUS PRO WIFI Gaming Motherboard is a mid-range offering which surprisingly packs some nice features which are above its price range. Coming from the AORUS family, one can be sure that this motherboard packs beefy power delivery in the form of 12+1 power phases using doublers. The board is harnessing the power of Z390 chipset designed for the Intel’s 9th generation of Core i series CPUs using the LGA1151 socket. The GIGABYTE Z390 AORUS PRO WIFI Gaming Motherboard has 4 DIMM slots with a maximum capacity of 128GB DDR4 in a dual-channel using a maximum supported transfer rate of 4266 MT/s. These slots are stainless steel reinforced and pack RGB LEDs. The board has dual M.2 ports with thermal guards. There are 3x PCIe 3.0 X1 slots, 2x PCIe 3.0 X16/x8 slots and 1x PCIe 3.0 x4 slot. The PCIe X16/X8 slots are stainless steel reinforced. There are 6x SATA3 ports which share bandwidth with the M.2 ports and PCIe 3.0 X4 slot. The beefy VRM/MOSFET cooling is coming from two aluminium heatsink, a thermal heat pipe and 1.5mm thick thermal pads. In terms of the cooling department, there are 8x hybrid 4-pin fan/pump headers with each rated for a maximum of 2A current with over-current protection. There are 8 thermal sensors across the entire PCB and 2 external sensors are provided. Smart Fan 5 is used to control the functionality of these headers. The motherboard has 8+4 pin EPS connectors. The board hosts plenty of USB ports including 5x USB 3.1 Gen-1 ports, USB 3.1 Gen-2 Type-A/C and USB 3.0/2.0 ports. The motherboard has 4 RGB LED zones and 4x lighting headers. It also comes with Intel GbE NIC and a 2×2 WiFi solution with an antenna. The Audio section is using WIMA capacitors to drive the Realtek ALC1220 with the VB series Audio Controller. In terms of the performance, this motherboard has been nothing short of what any Z390 motherboard can do. My complaint comes from the very fact that this motherboard is taking 1.345V VCore with Turbo LLC to drive my Core i5 9600k to 5.0GHz where the same chip was overclocked to 5.0GHz using 1.31V on the Asus Strix Z390E Gaming motherboard using medium LLC. GIGABYTE Z390 AORUS PRO WIFI Gaming MotherboardA treat for your 9th Gen Unlocked Intel CPUPros12+1 Power PhasesAdequate VRM/MOSFET Cooling2A rated hybrid fan/pump headersProvision of Thunderbolt headerReinforced DIMM Slots and PCIe SlotsIntegrated I/O Shield with RGB LightingConsNo debug LEDPlacement of USB 3.1 Gen-2 PortTakes more power than other Z390 motherboards for overclocking 2,064 ReviewsChipset: Intel Z390 Express Chipset | Audio: Realtek® ALC1220-VB codec | Wifi: Intel® CNVi interface 802.11a/b/g/n/ac | Form Factor: ATX Form Factor; 30.5cm x 24.4cm VERDICT:Our expectations were high from this motherboard and it did not disappoint us after all. With rich features, powerful power delivery mechanism and adequate cooling provision, the GIGABYTE Z390 AORUS PRO WIFI is a must-have and that is without breaking your wallet. Check Price
The GIGABYTE B760 Aorus Elite DDR4 Motherboard Has Been PicturedAORUS Gen5 SSD With Speeds of Up to 12GB/s Teased by GIGABYTEMSI Z370 Gaming Pro Carbon Motherboard ReviewAdvanced Motherboard Buying Guide – How to Buy A Motherboard For A Gaming PC